Quickstart Guide
OpenClacky is an AI assistant that lives on your computer — it can write documents, organize files, research topics, process spreadsheets, draft emails, and more. Just tell it what you need in plain language, and it gets it done.
This guide takes you from download to your first conversation in about 5 minutes.
Step 1: Download the Installer
Download the installer for your operating system from the official website:
- macOS: Download openclacky-installer.dmg
- Windows: Download openclacky-installer.exe
Step 2: Install and Launch
macOS
- Open the
.dmgfile by double-clicking it - Drag OpenClacky into your Applications folder
- Open OpenClacky from Applications and click "Open in Browser"
Windows
- Double-click the installer and follow the prompts
- Launch OpenClacky from the desktop shortcut and click "Open in Browser"
If Windows shows an "Unknown Publisher" warning, click "Run Anyway" to proceed.
Once installed, OpenClacky automatically starts a local service and opens the Web UI in your browser. If it doesn't open automatically, navigate to http://127.0.0.1:7070 manually.
Step 3: Visit the Welcome Page and Get Free API Credits
New users get a free trial credit — just complete a quick authorization and you're ready to go.
Step 4: Initial Setup (Optional)
You can set up the AI's persona and working memory to help it better understand your background and give more relevant answers.
You can skip this step and configure it later under Settings → General → Personalization.
Step 5: Start Using
Once setup is done, just type in the chat box and start your first conversation.
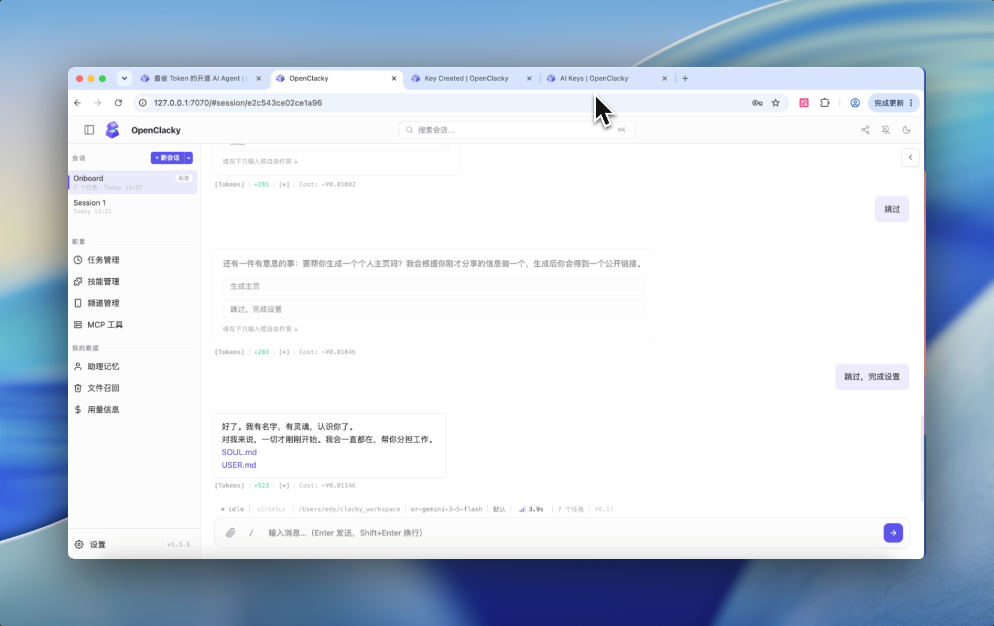
Just type what you want — like texting a message — and the AI starts working on it.
Try your first message:
"Write a weekly work summary for me. This week I completed..."
"Organize the scattered files on my desktop into folders by type"
"Draft an email to my colleague explaining that the project is delayed"
Step 6: When Free Credits Run Out — Buy and Configure an API Key
Once your free credits are used up, you can purchase and add your own AI Key to keep going without limits.
Don't have an API Key? Get one at openclacky.com/ai-keys and paste it directly into the field.
Go to Settings → Models → Add Model in the Web UI:
- Paste your API Key into the input field
- Click "Test Connection" — once it shows success, click "Save"
OpenClacky supports multiple AI providers: OpenClacky hosted keys, Claude, GPT, DeepSeek, Kimi, and more. See AI Key Supported Models →.
Key Features at a Glance
Attach Files
Click the paperclip icon next to the input field, drag files into the input area, or paste screenshots with Ctrl+V. Supports Word, Excel, PDF, images, and more.
Summarize the key points of this PDF for me
Analyze the data in this spreadsheet and identify any trends
/ Skills Menu
Click the / button on the left side of the input field to open the built-in skills list for one-click complex tasks:
/→ PPT: Describe the topic and get a presentation generated automatically/→ Image Generation: Describe what you want and AI draws it/→ Personal Card: Generate your personal homepage in one click
Scheduled Tasks
Let the AI work on a schedule:
Organize my to-do list every morning at 9 AM
Generate a weekly work summary every Friday at 5 PM
Troubleshooting
AI response quality isn't great?
Go to Settings → Models → Add Model in the bottom-left corner and switch to a better model. Recommended: Claude (best quality), DeepSeek (best value).
Task got stuck?
Click the ■ Stop button on the right side of the input field to interrupt, then rephrase your request.
Not sure how to phrase your request?
Plain language works perfectly:
- ❌ "Generate a structured analytical report based on Q3 business data"
- ✅ "Analyze last quarter's sales data for me — which products sold the best?"
Quick Setup Summary
| Step | What to Do | Time |
|---|---|---|
| 1 | Download installer | 1 min |
| 2 | Install and launch | 1 min |
| 3 | Visit welcome page and get free API credits | Instant ✨ |
| 4 | Initial setup (optional) | 1 min |
| 5 | Start using | — |
| 6 | Buy and configure API Key | 1 min |